This post is an extract from chapter 6 of Bootstrapping Microservices.
One of the best things that’s happened since the 1st edition of Bootstrapping Microservices is that a local version of Kubernetes now comes bundled with Docker Desktop, we simply need to to turn it on to start using it.
That’s right, we can now experiment and learn with a local instance of Kubernetes without having to install it (assuming you have Docker Desktop already) or without having to invest any time in cluster configuration and management.
This is absolutely the best starting point for learning Kubernetes because we can just start using it, running it on your own computer, it costs nothing and we don’t even have to worry about authenticating with it.
Getting the code
To follow along with this blog post and deploy the example microservice, first download the code or clone the repository that accommpanies chapter 6 of Bootstrapping Microservices and this blog post.
Download a zip file of the code from here:
https://github.com/bootstrapping-microservices-2nd-edition/chapter-6/archive/refs/heads/main.zip
You can clone the code using Git like this:
git clone https://github.com/bootstrapping-microservices-2nd-edition/chapter-6.gitEnabling your local Kubernetes instance
Figure 1 shows how we enable our local Kubernetes instance. Open the Docker Desktop window, click the Settings button at the top, select the Kubernetes tab, click Enable Kubernetes and finally click Apply & Restart. It might need to install an update to Kubernetes at this point and it could take a few minutes before it’s ready to go.
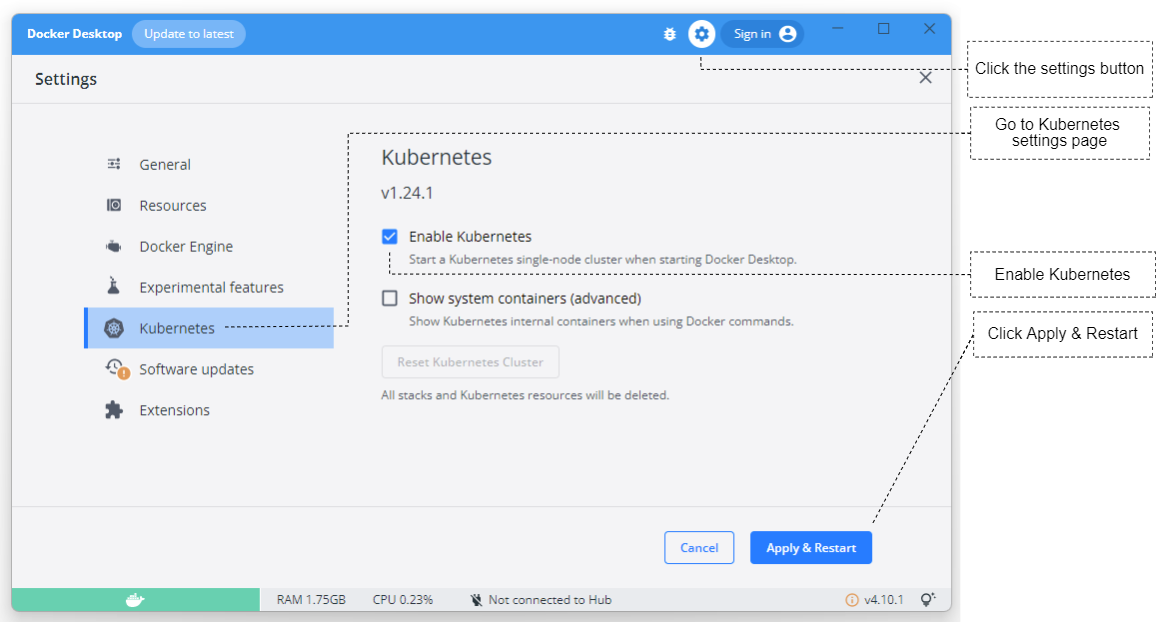
Figure 1 Enabling the local Kubernetes instance that comes with Docker Desktop
As you can see in figure 2, after enabling your local Kubernetes instance, we now have the button: Reset Kubernetes Cluster. It’s useful to remember this is here because it’s the fastest way to clean out our local cluster after we have finished a session of experimenting or learning.
Whatever you have deployed to the cluster can be quickly wiped away using this reset button, leaving you with a fresh cluster for your next session. The reset button is also the best way to solve any problem that might be happening. For example, if our Kubernetes instance stops responding or seems to have crashed, come back to this settings page and click the reset button. Or if we need to update our Kubernetes version - which you might need to do if you installed Docker Desktop a long time ago - click the reset button.
When we have finished a session of working with the local Kubernetes instance, and assuming we won’t need it again soon, please go back into Docker Desktop settings and disable Kubernetes. We don’t want to leave this running, especially on an under-powered computer because it consumes valuable system resources (not to mention your laptop’s battery).
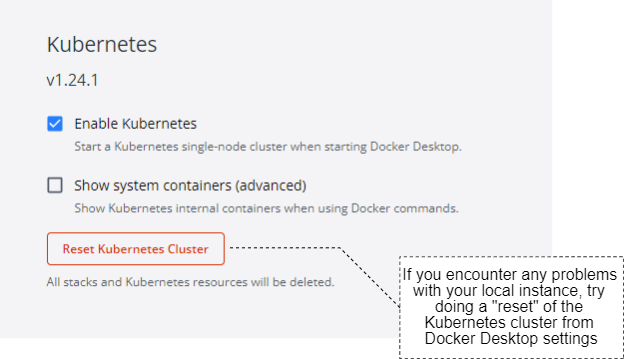
Figure 2 Resetting your local Kubernetes instance can sometimes solve any problem you have with it
To learn more about Kubernetes running under Docker Desktop please see their documentation:
https://docs.docker.com/desktop/kubernetes/
Installing the Kubernetes CLI
To interact with our Kubernetes cluster and deploy our microservice to it, we’ll use the Kubernetes CLI tool that is called Kubectl which also comes bundled with Docker Desktop.
For some reason though, Kubectl isn’t bundled with Docker Desktop for Linux. So when working on Linux we must install Kubectl according to the instructions in the Kubernetes documentation:
https://kubernetes.io/docs/tasks/tools/install-kubectl-linux/
To check if you have access to Kubectl, invoke the version sub-command:
kubectl versionThe output, which can be rather difficult to read, should look something like this:
Client Version: version.Info{Major:"1", Minor:"24", GitVersion:"v1.24.1", GitCommit:"3ddd0f45aa91e2f30c70734b175631bec5b5825a", GitTreeState:"clean", BuildDate:"2022-05-24T12:26:19Z", GoVersion:"go1.18.2", Compiler:"gc", Platform:"windows/amd64"}
Kustomize Version: v4.5.4
Server Version: version.Info{Major:"1", Minor:"24", GitVersion:"v1.24.1", GitCommit:"3ddd0f45aa91e2f30c70734b175631bec5b5825a", GitTreeState:"clean", BuildDate:"2022-05-24T12:18:48Z", GoVersion:"go1.18.2", Compiler:"gc", Platform:"linux/amd64"}
From the output we can extract the information about the version we are using for the Kubectl client (1.24.1) and for the Kubernetes server (1.24.1).
By default, when we enable our local Kubernetes instance, Kubectl should automatically be connected to it. However if we previously installed or configured Kubectl or have previously connected to some other Kubernetes cluster we might now be connected to something other than the local Kubernetes instance. If that’s the case you might see a connection error like this:
Unable to connect to the server: dial tcp: lookup <some cluster name>: no such hostIf you are seeing an error like that, don’t worry, we’ll see soon how to be sure that we are connected to the correct Kubernetes cluster.
Example project structure
Before we attempt to deploy the example microservice to Kubernetes, let’s briefly look at the structure of our example microservice project and see how it relates to Kubernetes deployment.
Figure 3 is an overview of example-1. You can see the JavaScript source code (index.js) and the Node.js project file (package.json, covered in chapter 2 of Bootstrapping Microservices). There’s the production Dockerfile (Dockerfile-prod) that we use to build the production Docker image for the microservice (covered in chapter 3 of Bootstrapping Microservices).
You can see that, we are baking a video directly into the Docker image. This isn’t a good production practice, but we are doing it to keep things simple while we learn how to deploy a single microservice to Kubernetes. In chapter 10 of Bootstrapping Microservices we deploy the full FlixTube application which uses cloud storage to store its files (the videos) and a MongoDB database to store metadata (extra information about the videos).
What's important here is the file deploy.yaml which you can see in figure 3. This is the file that contains the configuration to deploy our microservice to Kubernetes. In a moment we’ll take a look inside this file.
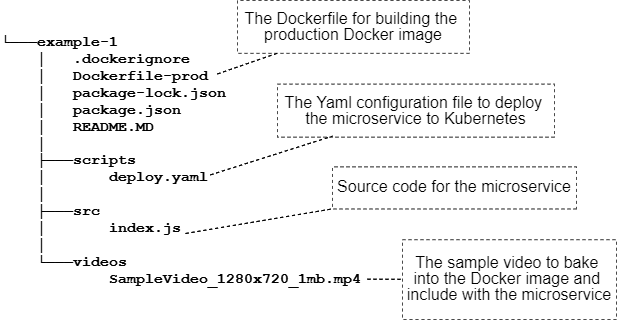
Figure 3 The structure of a microservice project that is deployable to Kubernetes
Deploying to the local Kubernetes instance
Ultimately we'd like to deploy our application to a Kubernetes cluster in the cloud, but an easier starting point is to first practice deploying our video-streaming microservice to our local Kubernetes instance.
We already have that, there’s nothing we need to install, so we can simply practice deploying our microservice.
Building the image for the microservice
Before we can deploy a microservice we need to build the image for it. As an example we’ll be using example-1 from Bootstrapping Microservice's chapter-6 code repository.
Open a terminal, clone the chapter-6 code (see earlier section), change directory into example-1 then build the image:
cd chapter-6
cd example-1
docker build -t video-streaming:1 --file Dockerfile-prod .
Note how we have tagged the image as video-streaming:1. After the colon is the version number and we are starting with version one for the first deployment of the video-streaming microservice. For future builds, after the code has changed, you should increment this version number for each new deployment of your microservice.
We don’t need a container registry (for local deployment)
Normally when preparing to deploy a Docker image to Kubernetes we must tag it (using the Docker tag command) and then publish it to a container registry (using the Docker push command) (both are covered in detail in chapter 3 of Bootstrapping Microservices).
However, when deploying to a local Kubernetes instance, we don’t need to tag or publish our image. Because Kubernetes is running locally on our computer, it already has access to our locally built Docker images, so we don’t need a separate container registry to share our images with our Kubernetes cluster. Any images that we build on our development computer are already where they need to be for deployment to our local Kubernetes instance.
Later in Bootstrapping Microservices, we work with a Kubernetes cluster in the cloud and when we do that we do need to publish our images to a container registry before deploying them. But for this example, working with a local Kubernetes cluster, we just don’t need a container registry. It’s one of the things that makes it much easier and more convenient to learn and experiment with a local Kubernetes instance, rather than jumping straight to a cloud-hosted cluster.
Creating a configuration for deployment to local Kubernetes
Let’s take our first look at a Kubernetes deployment configuration file. Listing 1 shows the deploy.yaml file from the scripts directory in example-1 that we saw in figure 3. We’ll use this configuration file to create the deployment, service and pod structure for our microservice.
Listing 1 Configuration file for deploying our microservice to Kubernetes (chapter-6/example-1/ scripts/deploy.yaml)
#
# Creates a Kubernetes deployment that keeps our
# microservice alive (restarting it automatically
# if it crashes).
#
apiVersion: apps/v1
kind: Deployment
metadata:
name: video-streaming
spec:
replicas: 1
selector:
    matchLabels:
    app: video-streaming
#
# A template for the pod that is created to host
# our microservice.
#
template:
    metadata:
    labels:
        app: video-streaming
    spec:
    containers:
    - name: video-streaming
        # Specifies the image and version.
        image: video-streaming:1
        # We are deploying locally and the image
        # never needs to be pulled from a container registry.
        imagePullPolicy: Never
        env:
        - name: PORT
        value: "4000"
---
#
# Creates a Kubernetes service that creates a
# DNS record and exposes our microservice to
# HTTP requests.
#
apiVersion: v1
kind: Service
metadata:
name: video-streaming
spec:
selector:
    app: video-streaming
# Creates a NodePort for the service, exposing
# the microservice on a port locally so that we
# can make HTTP requests to it.
type: NodePort
ports:
    - protocol: TCP
    port: 80
    # Maps port 4000 (inside the container) to port
    # 30000 on the host computer. This allows us to
    # make HTTP requests to the microservice from the
    # development computer.
    targetPort: 4000
    nodePort: 30000
The YAML configuration in listing 1 is broken up into two main sections that are separated by three hyphens (---). The first section creates the Kubernetes deployment that keeps our microservice alive (automatically restarting it when it crashes).
The second section creates the Kubernetes service that exposes our microservice to HTTP requests via DNS. Having these two sections in the same file is optional. We could, if we wanted, create a different structure, for instance with each section in its own file. But it’s convenient to group these together like this because they are all the configuration for one single microservice.
Within the first section notice the subsection for the pod template. The deployment uses this configuration template to instance the pod, its containers and therefore our microservice. Whenever the microservices crashes or stops responding, the deployment will replace it with a new instance, freshly created from this template. Note how we are referencing the image via the tag video-streaming:1 that we applied earlier including the version number, starting at version one. As you build new versions of the image for your microservice you’ll need to increment this version number and update the configuration in listing 1 to match (if that sounds tedious, in chapter 8 of Bootstrapping Microservices we talk about how to automatically a version number through our automated deployment pipeline).
Deployments, services and pods are associated with each other using labels. In listing 1 you can see labels, matchLabels and selector that tie together the pieces of our configuration by setting the app label to video-streaming. There’s nothing special about the app label or the name video-streaming. We could have called these anything.
Towards the end of listing 1 notice that the type of the service is set to NodePort. If we didn’t specify a type here, the type of the service would default to ClusterIP which would expose the service (and hence our microservice) only within the cluster - it would not be accessible outside the cluster.
Using NodePort here is the simplest way to make this service accessible from outside the cluster and in this case it's a local Kubernetes instance, so we are only talking about making the service (and our microservice) accessible from our local computer.
Kubernetes allows us to choose a port in the range 30000-32767 and it will pick a port at random if we didn’t specify a particular one. Notice in listing 1 we have chosen to use port 30000 to access our microservice, that’s just the first port in the allowed range. If you find any problem with port 30000 (like it’s not available on your computer) please choose a higher port number within the allowed range.
You can read more about NodePort configuration in the Kubenetes documentation:
https://kubernetes.io/docs/concepts/services-networking/service/#type-nodeport
Later when we start using a cloud-hosted Kubernetes cluster we’ll have to be more careful when exposing our microservices to the outside world, because it opens us to attacks and abuse. That doesn’t matter right now because we are working with a Kubernetes cluster on our local computer and the cluster itself is not exposed to the world.
Connecting Kubectl to local Kubernetes
At this point we have built an image for our microservice and we have created a Kubernetes configuration to deploy it. Before we can do the deployment to our local cluster, we need to have Kubectl connected to our local Kubernetes instance.
If this is your first time using Kubernetes and you have just installed Docker Desktop and enabled the local Kubernetes, then you should already be connected. The installation process sets this up for you by default.
To be sure though, let’s check which cluster we are connected to. Open a terminal and invoke this command:
kubectl config current-contextIf already connected to our local cluster, the output should be something like this:
docker-desktopIf you have used Kubectl before and connected to other clusters (say, if you are already using it for work), you might find at this point you are connected to some other cluster.
If that’s the case connect to your local cluster using the following command:
kubectl config use-context docker-desktopTo see the list of connection contexts we have configured, invoke this command:
kubectl config get-contextsWith Docker Desktop installed and Kubernetes enabled we should see docker-desktop (or something similar) in the list.
Once connected to our local Kubernetes, let's run a test to make sure the connection is working. The following command lists all pods that are running in our cluster:
kubectl get podsIf it's a new Kubernetes instance we should see a list that contains nothing! We don’t have any pods running yet. If you had been experimenting with Kubernetes already you might see some pods running that you deployed previously, if that’s the case you might want to hit the reset button in the Docker Desktop settings to get a fresh empty cluster.
Another good test is to view the system pods:
kubectl get pods --namespace kube-systemWe should see a short list of the Kubernetes system pods that are running in our cluster. By default these are hidden when we view pods, but we have exposed them here by explicitly requesting to show pods in the namespace kube-system.
For more information on working with Kubernetes under Docker Desktop, please see the Docker documentation:
https://docs.docker.com/desktop/kubernetes/
To explore the commands available under Kubectl, invoke kubectl --help or check out the Kubectl reference in the Kubernetes documentation:
https://kubernetes.io/docs/reference/kubectl/
Deploying a microservice to local Kubernetes
It’s time to deploy our video-streaming microservice to our local Kubernetes cluster. Make sure you are connected to your local Kubernetes cluster, as described in the previous section. Then in your terminal, change directory to example-1 and invoke Kubectl to deploy the microservice:
kubectl apply -f scripts/deploy.yamlThe -f argument specifies which configuration file to use and the apply sub-command creates the specified objects in our Kubernetes cluster.
If the deployment succeeded we should see output like this:
deployment.apps/video-streaming created
service/video-streaming created
Now let’s check that the requested objects are now running in our local Kubernetes instance.
To check the pods now running:
kubectl get podsWe should see output showing that our video-streaming microservice is now running as a pod:
NAME                               READY   STATUS    RESTARTS   AGE
video-streaming-56d66b75c7-fp44x   1/1     Running   0          92s
See how the name of the pod starts with video-streaming- but ends with a unique number. Kubernetes has generated a unique number for this pod because it could be one of a number of replicas that have been created for the deployment. In this case we are keeping things simple and our configuration file (listing 1) only creates a single replica, so we should only see a single pod in this list of pods.
To check the deployments that are now running:
kubectl get deploymentsWe should see the video-streaming deployment listed in the output:
NAME              READY   UP-TO-DATE   AVAILABLE   AGE
video-streaming   1/1     1            1           5m25s
To check the services that are now running:
kubectl get servicesIn the output we see at least two things. We should see our video-streaming service. We also see the service for the Kubernetes API:
NAME            TYPE      CLUSTER-IP   EXTERNAL-IP  PORT(S)      AGE
kubernetes      ClusterIP 10.96.0.1    <none>       443/TCP      11m
video-streaming NodePort  10.98.29.135 <none>       80:30000/TCP 6m16s
When we see the pod, deployment and a service running in our local cluster, it means we have successfully deployed our microservice. Note in the above output how it tells us that the video-streaming service is available on port 30000 (that’s how we configured it). This is a useful way to check the port number (and later the IP address) where our service is exposed.
Testing the locally deployed microservice
Now we must test that our microservice is actually working. Because we set the type of the service to NodePort and configured the port number to be 30000 (see listing 1) we should now be able to test our microservice and see the streaming video it contains by pointing our browser at http://localhost:30000/video. If everything worked and you can see the video playing, then congratulations, your video-streaming microservice is now running within Kubernetes.
Having problems? We talk about debugging deployments and microservices in chapter 11 of Bootstrapping Microservices.
Deleting the deployment
When we are done testing our microservice, we can delete the deployment and clean up our cluster:
kubectl delete -f scripts/deploy.yamlThis removes the deployment, the pod and the service: everything that was created from that configuration file should now be deleted. If you like you can confirm that everything is deleted by invoking kubectl get pods, kubectl get deployments and kubectl get services to confirm that it really is all gone.
Feel free to practice deploying and deleting this example microservice multiple times to get more experience with it.
Also don’t forget that you can reset your whole cluster by clicking Reset Kubernetes Cluster in the Kubernetes settings in Docker Desktop. If you have been experimenting for a while and done a few different deployments, it can be faster to just reset the cluster than trying to delete everything that you created.
Summary
We have built a Docker image for our microservice and deployed it to the local Kubernetes instance that came bundled with Docker Desktop.
We created a Kubernetes deployment, pod and service within the Kubernetes cluster by invoking kubectl apply and thus instantiated our video-streaming microservice in a production-like environment.
I say production-like because what we have just done is really only a simulation of what it’s like to run our microservice in production. To learn more about creating Kubernetes clusters and production deployments please see Bootstrapping Microservices.
Resources
- Learn more about Kubernetes under Docker Desktop by reading the Docker documentation:
- Learn more about Kubernetes by reading the Kubernetes documentation here:
- Learn more about Kubernetes objects and how to express them in Yaml configuration files, please start here: